|
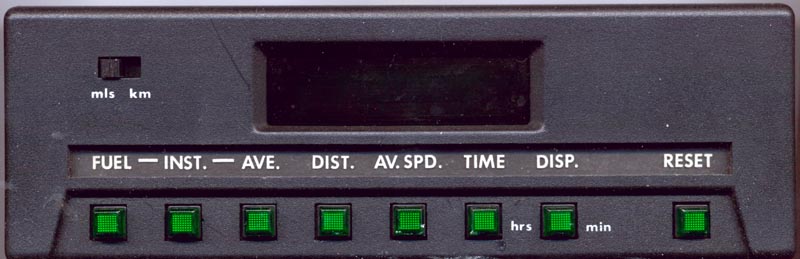
RESET:
Hold this switch for 10 seconds to reset the computer after a fillup.
RESET-then-DISP: Hold these switches to set the minutes on the clock. RESET-then-TIME: Hold these switches to set the hours on the clock. DISP: Press this switch to blank out the display while the computer is on. TIME: Press this switch to see the total time on since last reset; it then switches to showing the time of day. AV.SPD.: Press this switch to display the average speed (in the current units) since the computer was last reset. DIST.: Press this switch to display total distance traveled (in the current units) since the last reset. AVE.: Press this switch to display the average mileage (in the current units) since the last reset. INST.: Press this switch to display the instantaneous mileage (in the current units) over the last few seconds. FUEL: Press this switch to display the total fuel consumed (in the current units) since the last reset. mls/km: Slide this switch to select gallons/miles or litres/kilometres for the displayed statistics. NOTES: -- mls/km switch will cause the display to update after a couple of seconds. Both styles of units are always being tracked, and the switch can be moved at any time. -- Gallons are US Gallons or Imperial Gallons, depending on the part number of the trip computer, which varied according to the country it was sold in. But this can be changed in the field if necessary, see below. -- Mileage is reported as "miles per gallon" or "litres per 100 km" depending on the mls/km switch. Note the opposite sense of those statistics, but they are the norm for the regions they are used in. |
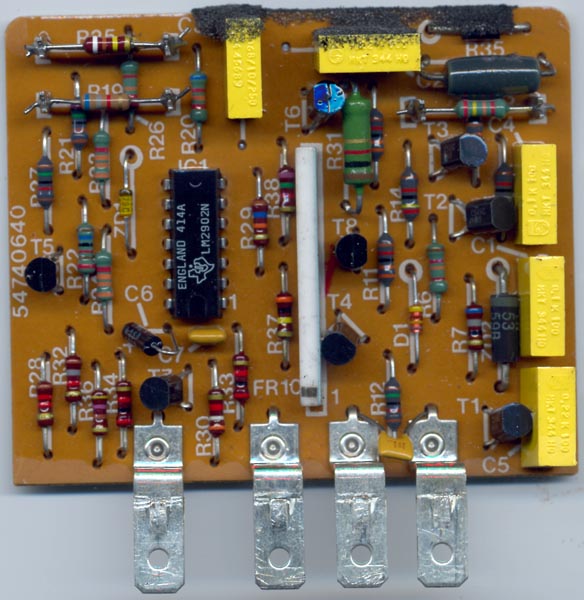
| This dead interface unit was brought back to life simply by replacing the op-amp on the board (designated IC1, part number LM2902N). Your dead interface unit may or may not be that easy to fix... |

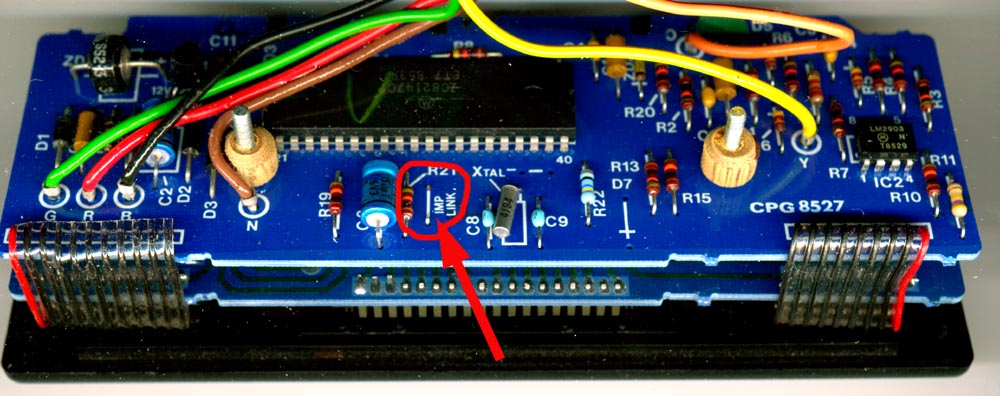
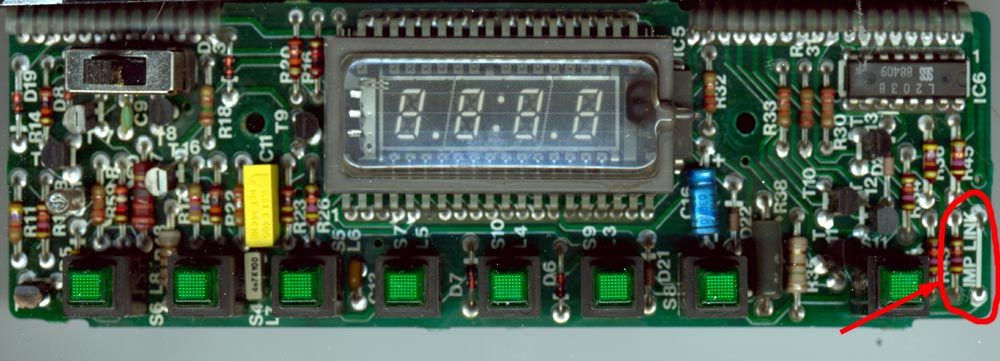
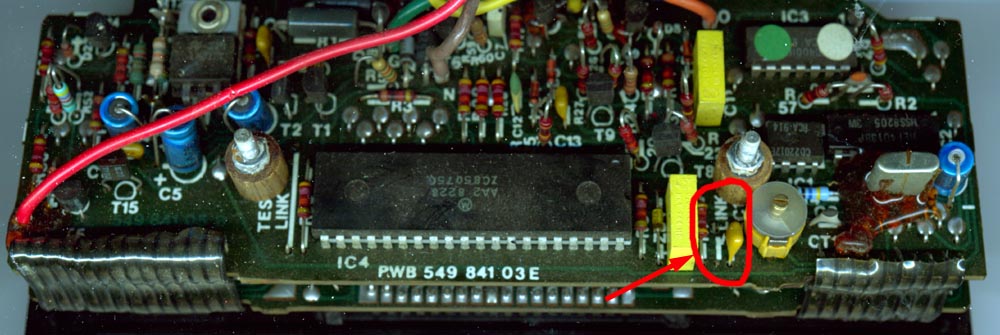
| The two different part numbers for the trip computer in any given year simply distinguish between one that reads in US gallons (for the US market) and one that reads in Imperial Gallons (for the rest of the world.) And the only difference between the two is the presence or absence of a jumper on a circuit board inside! For manufacturing reasons, the circuit boards are all made with the jumper in place, and then it is clipped off of boards intended to become part of a US-bound trip computer. If you have a rest-of-the-world (ROTW) trip computer that you want to convert for use in the US, simply find the jumper and clip it. If you have a US trip computer that you want to use somewhere in the ROTW, simply solder back a jumper where it had originally been clipped off. Below are three examples of where to find the jumper depending on the year. The jumper got more well-marked on the board over the years, but it was pretty evil of them to hide it on the display board at one point. Also note the presence of another jumper (marked "test link" on the 1982 model and unmarked on the 1984 model) on the older trip computers. Don't confuse it with the one for Imperial Gallons. If the test link is connected on powerup, the unit goes into a factory test mode. All display segements and dots are lit, and the leftmost button is lit. When you press it, the next button to the right lights up. As you press the buttons from left to right the light moves along ahead (except for the DISP and RESET buttons which have no light) until you finally press the RESET button and the display goes blank, then displays an "F" which I assume means failure... because it is no doubt looking for certain pulses on the inputs too, and I don't know what to give it. |
|
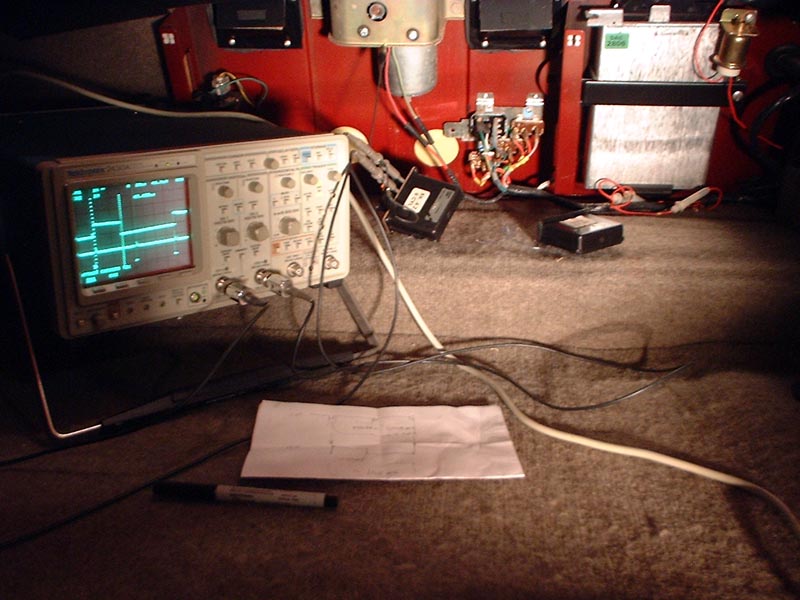
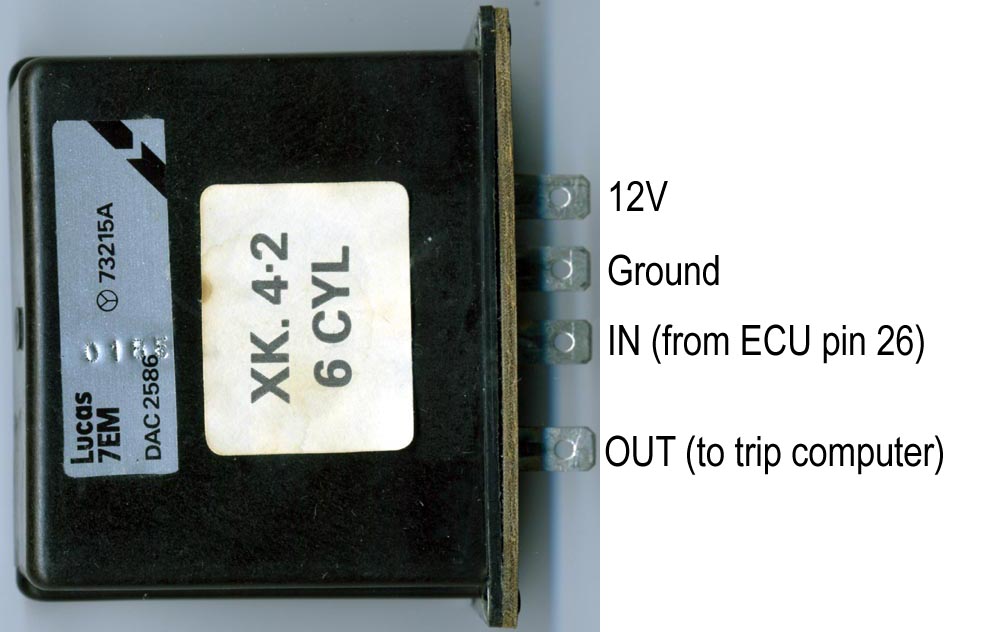
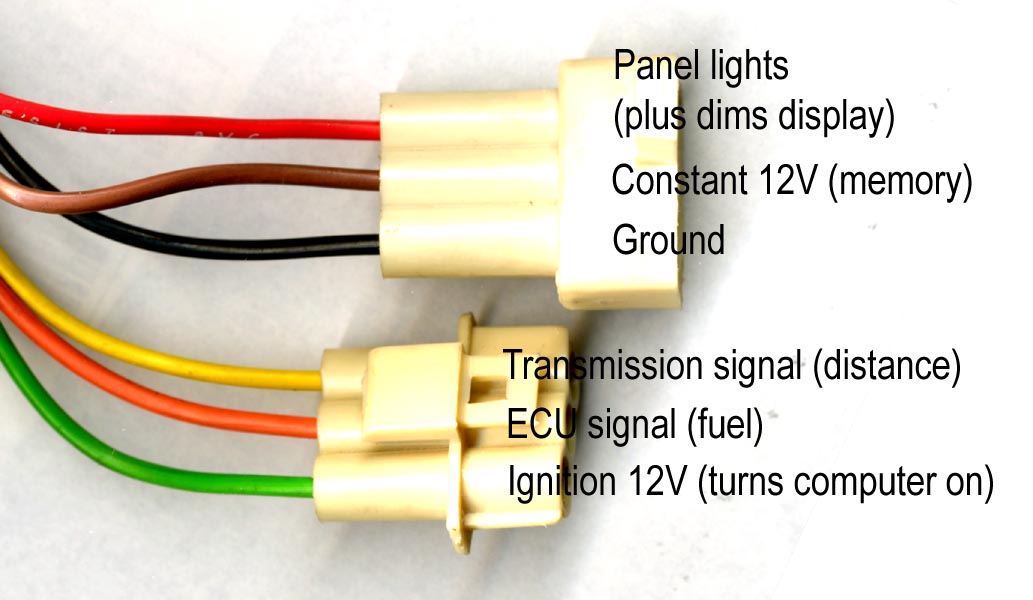
For fuel usage, the trip computer simply counts pulses fed to it by the Interface Unit, which is mounted next to the ECU in the trunk. The Interface Unit takes pulses from the ECU and converts them into a format that the trip computer can use. The ECU pulses are simply an exact copy of the pulses being sent to the injectors. The wider the ECU pulses (i.e. the more fuel being injected per pulse), the more pulses are generated by the Interface Unit. It's a pulse-width-to-number-of-pulses converter. The rate is approximately 1 output pulse per 3.3ms of input pulse time, with a floor of 1ms subtracted off the input pulse time (i.e. you get one output pulse for a 4.3ms input pulse, and two output pulses for a 7.6ms input pulse, and so on.) The input pulses are assumed to be coming in constantly, at about one every 75ms at idle, and more frequently at higher RPMs. The output pulse rate varies smoothly with the input pulse width and rate; it does not only change at intervals like I may have implied above when giving some specific numbers. It's safe to assume that the different Interface Units in cars with different engines simply alter this timing/pulse ratio, since the trip computers are all the same. If the trip computer is expecting a certain number of pulses per gallon, the Interface Unit has to be designed so that the width and number of injection pulses that deliver a gallon of fuel in that engine, generate that number of pulses on the Interface Unit output pin. The following specific numbers and features were based on playing with a 1985 era trip computer. I have already seen that one older trip computer behaved slightly differently (a few more pulses needed per gallon, different behavior of the trailing zeros and decimal point, etc.) so don't fret if you have a different era trip computer and it does not behave exactly like this. It's similar, at least. When the trip computer receives 4800 pulses, it will add .1 US gallon to the fuel used meter. It will do this through .9 gallons, but then it only takes an additional 4060 pulses to get to 1 even gallon. This is apparently how they decided to make up the stacking error from dividing out all these decimal numbers on an integer processor. So that's 47260 pulses per gallon. Similarly for Liters it takes 1269 pulses per .1L but only 12493 pulses for a full Liter because of the short "make-up" count from .9 to 1. And again for Imperial Gallons, it's 5777 pulses for .1 I.G. but 56890 pulses for a full I.G. None of these numbers work out *precisely* against the official conversion rates between units. Imperial Gallons seem to be the farthest off though we're still only talking a hundred pulses out of nearly 57,000... or about a tenth of one percent. For the other units its much closer. I guess since the trip computer only gauges amounts to the nearest tenth of a unit anyway, it just doesn't matter. In the same fashion, the trip computer counts pulses received from the transmission speed sensor (the same signal that goes to the speedometer) to determine distance driven Once again the exact specs on the pulses don't matter, only the number of them, though the processor can't handle pulses which are outrageously narrower and more closely spaced than expected. (It really doesn't like it if the rate of pulses hits 256 kph or 256 MPH. It will still count distance, but the average speed won't update.) Tenths of miles are racked up by 812 or 813 pulses (depending on which tenth), while a final 687 pulses brings it to an even mile, with a total of 8001 pulses. Tenths of kilometers are racked up by 504 or 505 pulses, while a final 428 pulses brings it to an even kilometer, for a total of 4972 pulses. In the same way that the number of pulses needed depends on which tenth of a mile or kilometer, the number of pulses needed for a whole mile or kilometer depends on which one it is; sometimes it is one pulse more or less than stated. But none of this is random, the scheme is deterministic, e.g. it always takes 812 pulses to go from 0.2 miles to 0.3 miles, while it always takes 813 pulses to go from 0.3 miles to 0.4 miles. It always takes 8001 pulses to go from 1 mile to 2 miles, while it always takes 8000 pulses to go from 2 miles to 3 miles. The processor simply starts counting time for every second it is "on" from the ignition switch after a reset. It uses this to display total on time since last reset, and to calculate average speed since last reset. Average mileage calculations are done by dividing out distance traveled over fuel consumed since last reset. Instantaneous mileage is calculated by dividing out some very short buffer worth of distance and fuel pulses recently received. Miles/gallons and kilometers/liters are always simultaneously being accumulated. The front panel switch changes which one is displayed after a brief update lag. The "Imp Link" jumper on the circuit board, when connected, will cause the gallons to accumulate at the Imperial Gallon rate instead of the US Gallon rate. This change happens instantaneously... which is not an issue since the board is manufactured one way or the other... but if someone were to add another switch to be able to switch it on the fly, it would not convert already-logged fuel consumtion when switched. It will only start logging further fuel consumption at the new rate. The display has 4 digits. Its normal mode of operation is to display whole units and tenths of units, with all leading and trailing zeroes suppressed, unless the value is exactly 0. So the values proceed like so: 0 .1 .2 .3 .4 .5 .6 .7 .8 .9 1 1.1 1.2 Note that the decimal point is also suppressed on whole numbers. If you do not reset the trip computer with each fillup, it will continue to accumulate all the values to some astonishingly high levels. When you go from 999.9 units to 1000 units, it simply stops displaying the decimal point and any tenths of units. So the values proceed like this: 999.8 999.9 1000 1001 1002 with display updates happening 1/10 as often once 1000 is reached. I have not explored the upper ends of its function (eg > 9999 units) or what happens to mileage calculations when one of the numbers exceeds 4 digits, simply because there are so many pulses involved and it takes too long to get there and see, even on the bench with a pulse generator. |
|
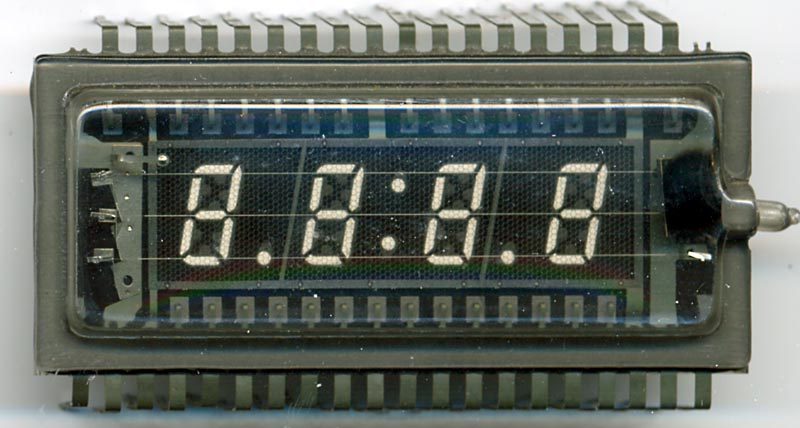
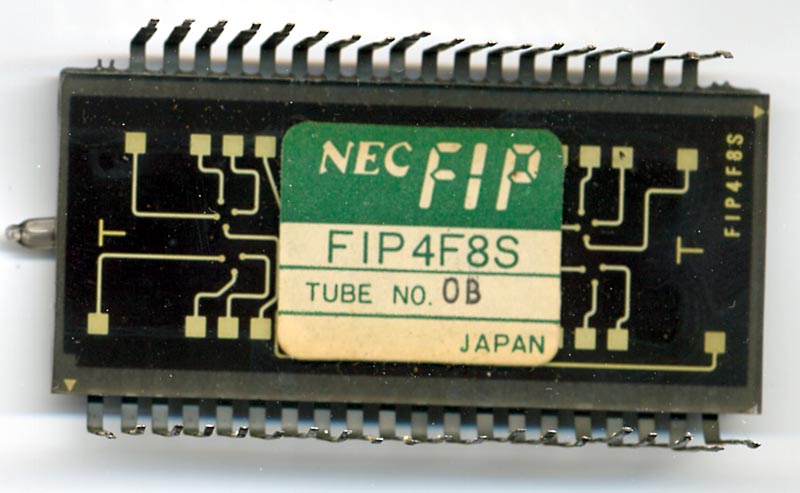
As near as I can tell, the display tube is currently made of unobtanium.
If anyone knows of a source for them, let me know! VFDs do eventually
start to fade...though there are tricks for "burning off" the crud that forms
on the grid wires, and I'll play with that at some point. But they also
just die, and there's no trick for bringing those back to life.
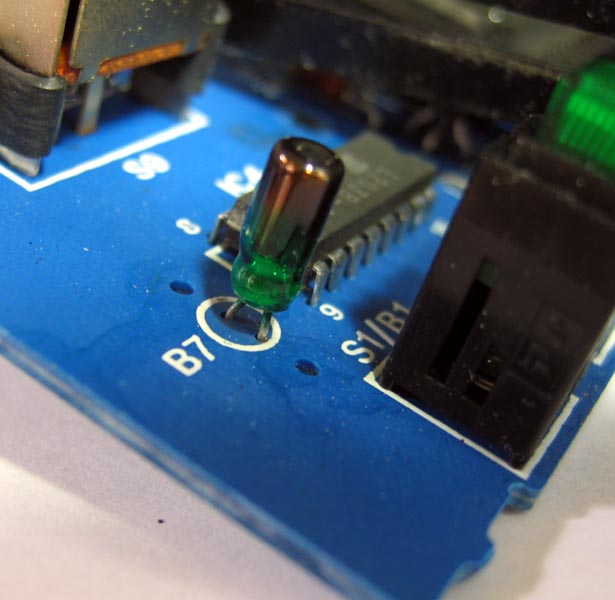
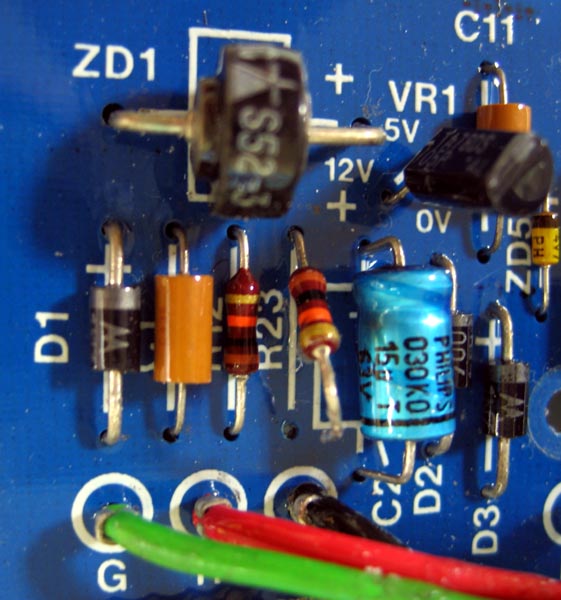
How about making the display brighter? You can do it with higher voltage, but that can shorten the life of the tube, and since I can't even find the official specs on this tube I'm just going to assume Lucas was already running them as hot as is safe and we shouldn't mess with that. Cleaning the display tube and the back side of the filter plastic sure helps - they attract dust and get hazy. VFD filter technology has gotten a lot better since the 80's, so replacing the filter plastic with a newer piece would help a lot, but obtaining the material in small quantities and cutting it to that precise size can be problematic. (I'll be pursuing that angle in time, though!) If you drive with your headlights on in the daytime, like I do, it's annoying that the display dims when the trip computer illumination is turned on. Just when you most need a bright display, it's dim! Since there's no such thing as something being too bright on a British dash at nighttime, let's just get rid of that feature, OK? This will leave the display and the function buttons bright at all times, day or night. On the older trip computers, the circuit lowers the voltage to the display, so we need to clip a resistor that feeds that circuit. On the newer trip computers, the computer actually duty-cycles the display less frequently to make the numbers look dimmer, so we need to clip the resistor in the circuit that tells the processor that the lights are on. In both examples below I have desoldered one end of the resistor, to make it more obvious and allow you to read the board designations more easily. But if you're making this mod, you can just clip either end of the resistor with small wirecutters, or clip both ends and remove it from the board entirely. |
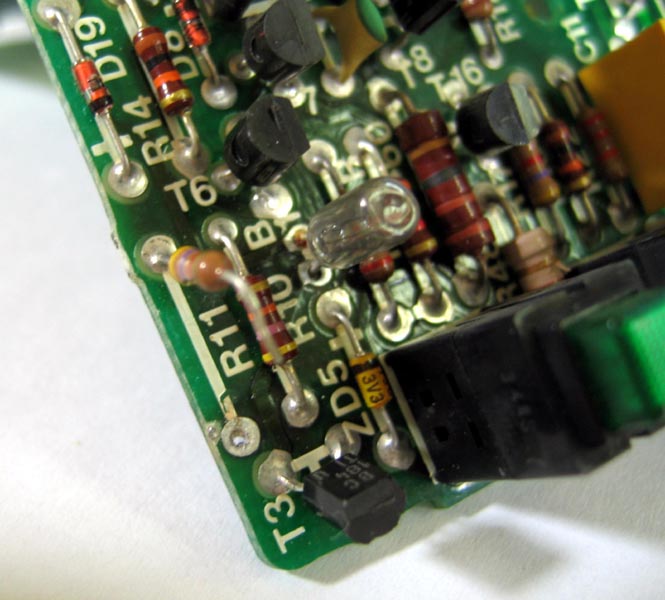
| Also notice the bulb (B1) in the above picture. On the old style trip computers it was a clear bulb. On the newer style (below) it's painted green... except that by this age the green has all burned off and turned black and the light just looks yellowish-white like with the clear bulbs anyway! I'm still working on finding a source for these bulbs, to replace burned out ones or just to brighten things up with a non-blackened replacement for an aging bulb. |